
Blog
How to Choose the Best Facial Contouring Products
Choosing the best Facial Contouring products is not simply about finding the darkest shade. It requires understanding your skin tone, texture, face shape, and daily makeup habits. A product that looks sculpted under studio lights may appear harsh beside a sunny window. That difference matters.
I have learned that cream contours often blend more naturally on dry or mature skin, while powders can offer cleaner control over oily areas. Neither option is automatically better. Your skin decides. Look for shades with balanced undertones, especially soft neutral or cool tones that resemble natural facial shadows. Orange or overly warm colors can make the face look stained instead of defined. A small amount is usually safer than a heavy first layer.
Check the ingredient list carefully, particularly if your skin reacts easily. Fragrance, essential oils, and certain preservatives may cause discomfort for sensitive users, although reactions vary. Patch testing near the jawline can reveal problems before applying a product across the face. It is not a perfect guarantee.
Not every popular product deserves your trust. Read verified reviews, compare packaging claims, and consider guidance from qualified dermatologists or experienced makeup artists. Also inspect the texture, expiration information, applicator, and return policy. These details are easy to overlook.
There is no universal winner.
This guide will compare product types, finishes, shades, and application methods. It will also question common marketing promises, because “natural-looking” can mean different things under different lighting. The right choice should enhance your features comfortably, evenly, and with enough flexibility for real life.
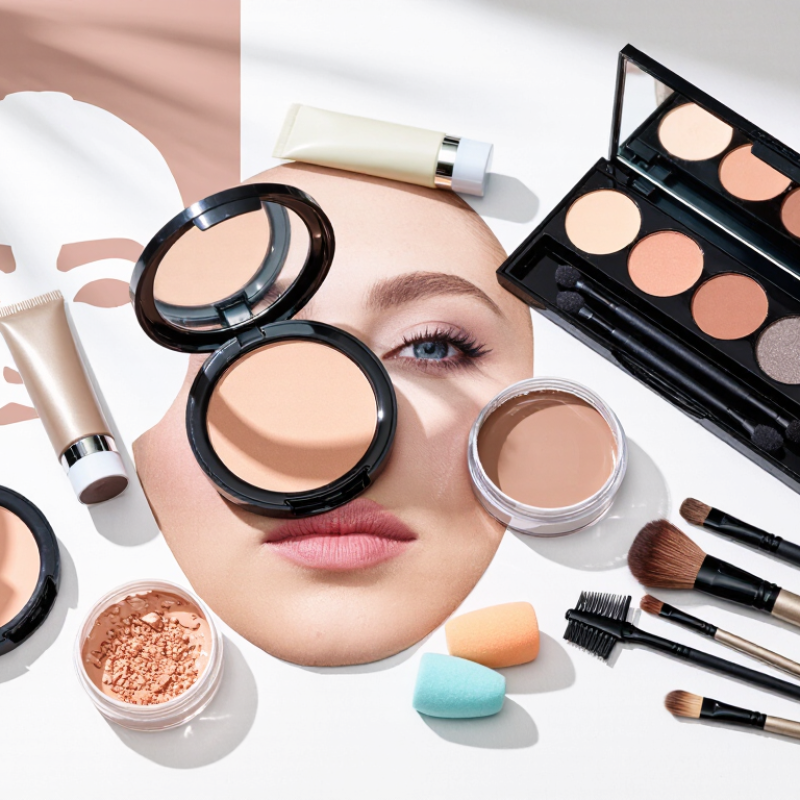
Understanding Facial Contouring and Its Main Product Types
Facial contouring uses light and shadow to create the appearance of structure. It can define cheekbones, soften a jawline, or make the nose look narrower. The result should still look like skin, not painted geometry. In my experience, the best product depends on your texture, skill level, and desired finish.
Cream and stick contours blend easily with fingers or a damp sponge. They suit dry or normal skin and create a fresh, natural effect. Powder contours offer more control and work well on oily skin or over foundation. Liquid formulas can look seamless, but they require quick blending. Choose a neutral or slightly cool shade for realistic shadows. Warm brown shades may look more like bronzer. A shade one or two levels deeper than your complexion is usually easier to manage.
Tips:
Test the color near your jawline. Use a small amount. Build slowly. Blend toward the hairline, not downward. Natural light reveals harsh edges better than a bathroom mirror. Clean brushes regularly, especially when the product touches textured skin. My first attempts were too dark and too low on the cheeks. That mistake taught me to place contour beside the shadow, rather than directly below it. Skin texture, facial movement, and personal preference matter more than rigid online diagrams. A perfect map does not exist.
Assessing Your Face Shape, Skin Type, and Contouring Goals
Choosing the best facial contouring product starts with your face shape, not a trend. Look in natural daylight and note your jawline, cheekbones, and forehead width. Oval faces often need subtle definition along the cheek hollows. Round faces may benefit from vertical shading near the temples and jaw. Angular faces usually look softer with diffused color.
Skin type also affects product choice. Dry skin often feels more comfortable with a creamy formula and a damp sponge. Oily skin may prefer a lightweight powder and a small, clean brush. Sensitive skin needs a shorter ingredient list and a patch test behind the ear. Wait 24 hours. Irritation is not a contouring problem to ignore.
Your goal matters just as much. For everyday makeup, choose a shade only one or two levels deeper than your skin. For photography, stronger definition may work, but harsh edges can appear under flash. Blend toward the hairline and check both sides of your face. They are rarely identical. My early attempts were too dark and placed too low, which made my cheeks look heavier. That mistake taught me to build color slowly, then reassess after five minutes. Use less product than you expect.
Comparing Formulas, Shades, Finishes, and Application Tools
Choosing facial contouring products starts with formula, not viral claims. Creams blend easily over hydrated skin and suit dry or textured areas. Powders offer a cleaner feel and better control on oily zones. I often test both along the jawline. That small area reveals patchiness quickly. Balms can look natural, but they may shift under warmth or sunscreen. This is where my preference needs checking.
Shade matters more than intensity. A contour shade should usually appear slightly deeper than your skin, with a muted undertone. Cooler taupe tones can suggest a natural shadow, while warmer shades may resemble bronzer. Test the color in daylight, not under bright bathroom bulbs. Matte finishes create believable depth. A soft satin finish can add dimension, but visible sparkle rarely imitates a real shadow. Skin texture changes the result, too.
Application tools control how much pigment reaches the face. A small angled brush gives precision around the cheekbone and nose. A damp sponge softens edges and reduces excess product. Fingers work well with cream formulas, especially near the temples. Too much product? Remove some before blending. I still overapply when working quickly. Clean tools regularly, because old residue can make even a good formula look uneven. A mirror near a window often gives more useful feedback than a close-up magnifying mirror.
Checking Product Safety, Wear, and Compatibility Before Buying
Before buying a facial contouring product, check its safety record and ingredient list. “Natural” does not automatically mean gentle. The American Academy of Dermatology recommends applying a small amount to a test area twice daily for seven to ten days. Watch for burning, swelling, itching, or persistent redness. Stop using it if your skin reacts. This simple step is easy to skip when a product promises sharper cheekbones.
Wear matters as much as appearance. In 2023, Circana reported that U.S. prestige beauty sales reached approximately $31.7 billion, rising 14% from the previous year. More choices also mean more formulas to compare. A cream contour may suit dry skin, while a powder can emphasize flaky patches. Test the product near your jawline in daylight. Then wear it for several hours. Check whether it separates, transfers onto clothing, or settles into fine lines.
Compatibility deserves a closer look. Review the full ingredient list, especially if you already use exfoliating acids, retinoids, or fragrance-sensitive skincare. I still make this mistake: judging a shade before testing the texture. That can lead to an expensive mismatch. Consider your sunscreen, moisturizer, and foundation together. Products may pill when their bases conflict. Patch testing is not perfect, but it reduces avoidable surprises. Take photos after application and near the end of the day; the difference can be revealing.
How to Choose the Best Facial Contouring Products - Checking Product Safety, Wear, and Compatibility Before Buying
| Product Format | Typical Finish | Approximate Wear Time | Best Skin Compatibility | Safety Checks Before Buying | Common Compatibility Concerns | Application and Removal Notes |
|---|---|---|---|---|---|---|
| Powder contour | Soft matte to satin | About 6–8 hours | Normal, combination, and oily skin | Check the ingredient list, pressed-powder integrity, shade labeling, and any fragrance or known personal allergens. | Can emphasize dry patches or look uneven over heavily dewy products. | Apply after complexion products have set. Remove with a gentle cleanser; avoid sharing brushes to reduce contamination risk. |
| Cream contour | Natural to luminous | About 4–8 hours | Normal, dry, and mature skin | Look for a sealed container, a clear ingredient list, an expiration or period-after-opening symbol, and storage instructions. | May feel heavy or move more quickly on oily skin; fragranced formulas may bother sensitive skin. | Blend in thin layers. Use a gentle oil, balm, or cleanser suitable for the rest of the makeup and follow with a mild face wash if needed. |
| Contour stick | Creamy natural to matte | About 5–8 hours | Normal to dry skin; convenient for targeted application | Check whether the formula is sealed, inspect the twist mechanism, and avoid products with an altered smell, color, or texture. | Direct application can transfer oil, bacteria, or makeup residue back to the stick if the skin is not clean. | Apply a small amount or use a clean brush. Wipe the surface when appropriate and do not share the product. |
| Liquid contour | Natural, satin, or dewy | About 6–10 hours | Most skin types, depending on the base formula | Check the dispenser, ingredient list, shade description, and whether the formula contains alcohol or fragrance that may be unsuitable for you. | Some formulas can separate, pill, or disturb sunscreen and foundation when layered too quickly. | Use a small amount and blend promptly. Allow skincare and sunscreen to set before applying makeup. |
| Cream-to-powder contour | Soft matte to satin | About 6–9 hours | Normal and combination skin | Review the full ingredient list and confirm that the texture has not dried out, cracked, or changed since opening. | May cling to flaky areas and can become difficult to blend after it sets. | Work one area at a time with a clean sponge or brush. Avoid repeatedly rubbing the skin during removal. |
| Contour balm | Sheer, glossy, or natural | About 3–6 hours | Dry or normal skin | Check for a secure lid, clean packaging, fragrance disclosure, and ingredients that may conflict with personal sensitivities. | May feel greasy, migrate into lines, or contribute to congestion for some acne-prone users. | Apply sparingly over moisturizer. A cleansing balm or oil cleanser can help dissolve the product before a gentle water-based cleanser. |
| Contour palette | Usually includes matte and satin shades | About 5–8 hours, depending on the pan | Useful for users who need multiple undertones or intensities | Check every shade if sensitivities matter; confirm the palette closes securely and inspect for broken pans or loose particles. | Unused shades may expire before they are finished; different textures may layer poorly together. | Use separate clean tools for cream and powder pans. Keep the palette closed and dry between uses. |
| Water-activated contour | Matte to watercolor-like | About 4–8 hours | Normal to oily skin, depending on the formula | Check whether the product requires a specific activating liquid, review preservation instructions, and avoid adding water directly to the container unless directed. | Too much water can dilute coverage; damp tools and poor storage can increase contamination risk. | Use a clean, slightly damp tool and allow each layer to dry. Close the container immediately after use. |
Building a Practical Routine for Natural-Looking Contours
Natural-looking contouring starts with a routine you can repeat, not a crowded makeup bag. Grand View Research estimated the global facial cosmetics market at about USD 38 billion in 2023, showing strong demand for complexion products. More choice can help, but it can also encourage unnecessary layering.
Begin with moisturized skin and daytime sun protection. Let each layer settle for one minute. Choose a contour shade only one or two tones deeper than your complexion. Neutral or slightly cool undertones usually create a softer shadow. Place a small amount beneath the cheekbone, along the jawline, and near the hairline. Keep the product close to natural recesses. Blend upward with a damp sponge or a small synthetic brush.
Less product works better.
For dry skin, a cream formula can look more flexible. Powder may suit oilier areas, especially around the forehead. The American Academy of Dermatology recommends testing new products on a small skin area before regular use, particularly when irritation is a concern. Remove makeup gently at night, without scrubbing the cheek area. Circana’s 2024 beauty reporting also highlighted consumers’ continued interest in complexion products that offer practical, multi-use benefits.
I still overblend one cheek sometimes. That uneven result is useful feedback. Check your face beside a window, then soften only the visible edges. Harsh bathroom lighting can make a natural contour appear heavier than it is.
How to Choose the Best Facial Contouring Products
Building a Practical Routine for Natural-Looking Contours
The scores are a practical 1–5 selection guide based on common product characteristics. Cream and liquid formulas generally offer easier blending and buildable coverage, while powder formulas can provide stronger oil control and longer wear. Start with a small amount, blend along the natural hollows of the face, and add intensity gradually.
Related Posts
-
What Is the Best Type of Spider Vein Treatment?
-
What is Dermal Fillers and How Do They Work?
-

China Top 10 Rosacea Treatment Manufacturers
-
2026 How to Achieve Perfect Skin Rejuvenation Naturally?
-
How to Choose the Best Pigmentation Treatment for Your Skin?
-

How to Source Skin Care Treatments Globally in 2026?
Contact Us
Feel free to contact us anytime for questions, support, or assistance. We're here to help you with any inquiries you have.
- Address: 10220 S. Dolfield Rd Suite 110
Owings Mills, MD, 21117 - Email: sale@oshanbeauty.com
- Call Us: (410) 356-0000
- Working hours:
Monday – Friday: 9am – 5pm
Saturday and Sunday: Closed